What is Apache virtual host?
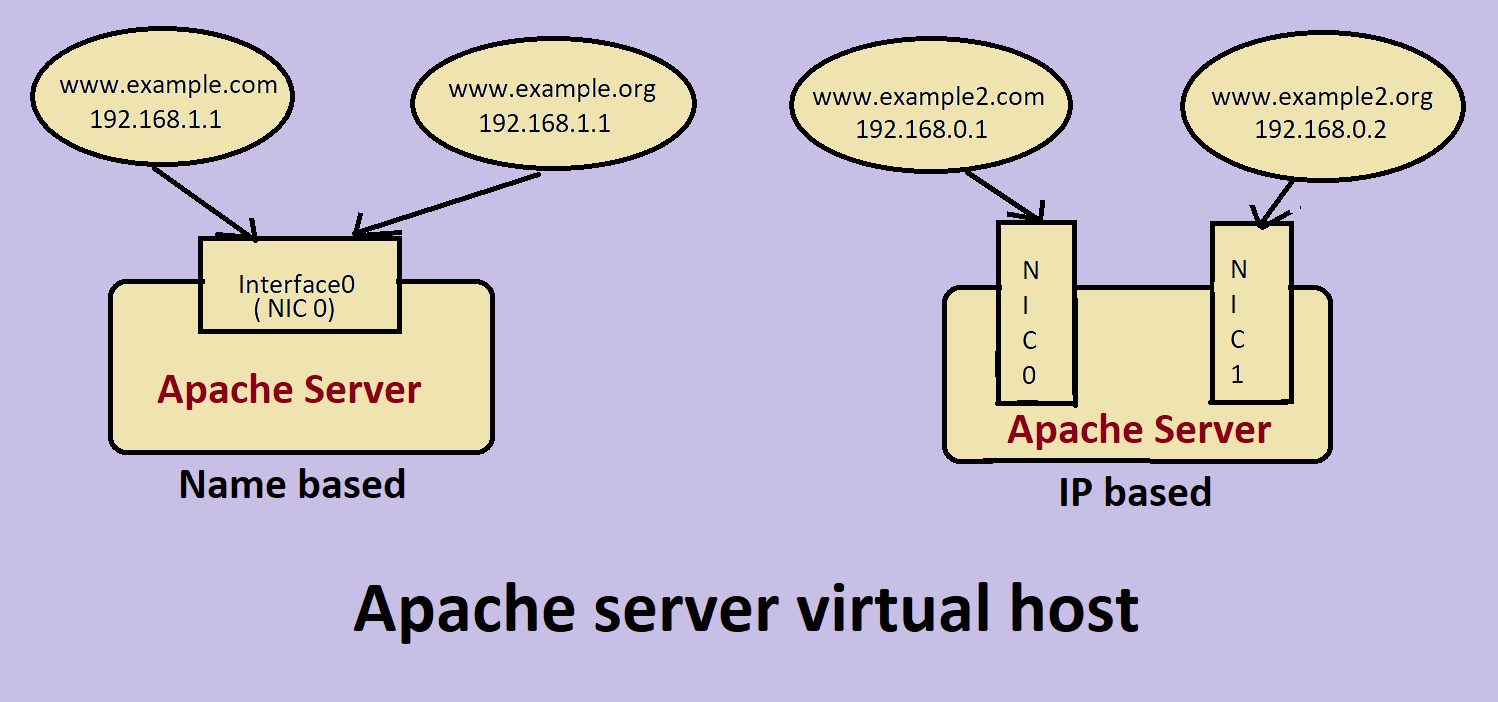
Apache virtual host are like multiple websites that run on a single server. Server supports two variations of virtual host.
- Name-based virtual host
- IP-based virtual host
So, what it means is, virtual host configuration directive of the apache server allows us to run as many websites on a single machine. For clients, the website seems to be hosted on separate servers but in reality they run on single servers. Yes, there is a limit to how many websites can a server host and this depends on server hardware. We can host as many websites, the server can request without performance degradation.
Name based vs IP based virtual host
In name based virtual hosting the server relies on the host name to differentiate between the multiple websites hosted on the server. So, it uses the same ip address port combination for all the virtual hosts. It is easy to implement since we need only DNS to configure. Resolve the host names to correct IP address and let the server identify each host names by setting the server name in each virtual host configuration directive.
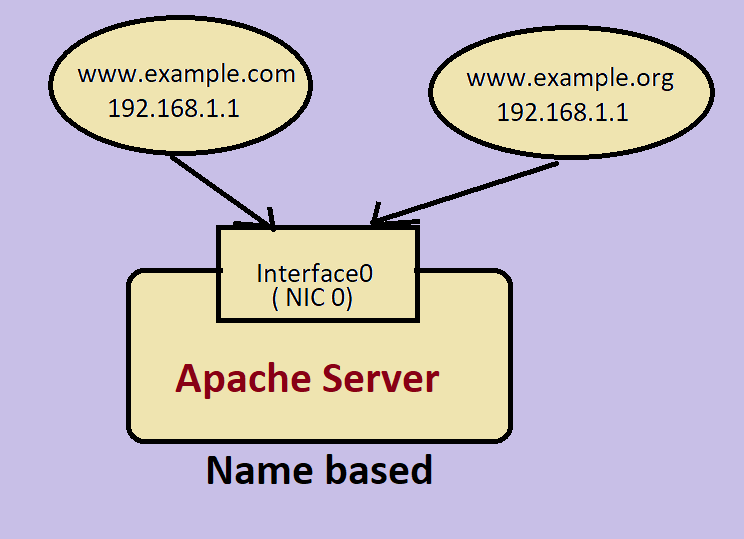

Testing Environment Data for Name based virtual host
Host1: www.example.com IP : 192.168.101.6
Host2: www.example.org IP : 192.168.101.6
First, we create root directories for our website at
/var/www/html/project1
and /var/www/html/project2. project1 is the root directory of example.com and
project2 is the root directory for example.org.
Open cmd and type.
# mkdir sudo /var/www/html/project1
# mkdir sudo /var/www/html/project2
This will make two directories at specified location. Now its time to make index.html files for the home page of respective websites.
Go to the directory /var/www/html/project1.
Type into cmd
cd /var/www/html/project1 and create a index.html file there by typing
gedit index.html.
Similarly, go to /var/www/html/project2.
Type
cd /var/www/html/project2 and create a same index.html file there by typing
gedit index.html.
Put this code into both the index.html and save.
                            <html>
<head>
<title> My Website <title>
</head>
<body>
<h1> This is a test webpage</h1>
</body>
</html>
So, your website root directory and home page is ready.
Next, you need to configure the configuration files in order to listen client request at a specified interface.
Debian version of OS like Ubuntu have hierarchy of configuration files. The apache2.conf is the main configuration file. In order to bring required changes come into effect we need to edit apache2.conf and 000-default.conf files. The 000-default.conf file is found in /etc/apache2/sites-enabled directory.
Search for the <VirtualHost> directive in the 000-default.conf file. By default you will see one <VirtualHost> </VirtualHost> directive. You need to add as many directive as there is websites. In this case add two <VirtualHost> directive.
<VirtualHost *:80>
    ServerName www.example.com
    DocumentRoot /var/html/www/project1
</VirtualHost>

<VirtualHost *:80>
    ServerName www.example.org
    DocumentRoot /var/html/www/project2
</VirtualHost>
Add one line into your main configuration file apache2.conf
ServerName 192.168.101.6 and save the file.
In order to acces these websites via browser, we need to update our local DNS also which is at
/etc/hosts. Open the hosts file in a text editor and add these two lines.
         192.168.101.6 www.example.com
         192.168.101.6 www.example.org
So, you have successfuly hosted two websites, www.example.com and www.example.org at apache http server using name based virtual host directive.
Now, we move on to IP based virtual hosting on apache server.
Testing Environment Data for IP based virtual host
Host1: www.example.com IP : 192.168.101.5
Host2: www.example.org IP : 192.168.101.6
As, I have already stated in IP based hosting we need a bunch of IP adresses to assign each virtual host a unique IP or we can use the concepts of virtual interface also.
The only change which we need to address here is assign each virtual host a unique ip address port combination in the 000-default.conf file. This is done like this...
<VirtualHost 192.168.101.5:80>
    ServerName www.example.com
    DocumentRoot /var/html/www/project1
</VirtualHost>

<VirtualHost 192.168.101.6:80>
    ServerName www.example.org
    DocumentRoot /var/html/www/project2
</VirtualHost>
In Ip based virtual host we have explicitly assigned a unique IP address to each websites. Server uses this IP address to differentiate between the host. We need not mention any ServerName here but I have mentioned. We dont need to make any chnage in the apache2.conf file also. With all this your server configuration for IP based virtual host completes. Update the hosts file as you have done previously. Replace the lines which you have added previously with
         192.168.101.5 www.example.com
192.168.101.6 www.example.orgNote:
To set IP address of a interface, type into cmdifconfig eth0 192.168.101.5 255.255.255.255 and
ifconfig eth0 192.168.101.6 255.255.255.255.
If you dont set up your ethernet interface nic, you wont be able to expermient virutual hosts in your ubuntu machine.
This experiment will run on all debian based Operating system like Ubuntu.
